Friday, May 28, 2010

Summer Cooking Bonus Lesson

After watching this video, I am convinced it is a genius idea. Clear and concise videos and print material to guide you through recipes and techniques in the comfort of your own home! What could be better? The Nourished Kitchen is starting an online cooking class June 1. This ecourse is all about how to cook real food including; soaking grains, sourdough breads, pickling and fermenting, homemade stocks, water kefir, cheese, salad dressing, menu planning and more.

My first grader is in a 2 week summer camp and needs to bring the requested "non-perishable" snack each day. There are not a lot of health options out there as real food spoils. I made these "lara bars" this morning using Jenny's simple instructions for my son to get some real sustenance each day at camp instead of a hand full of food-like substance. I found the print material very helpful to refer to not only the recipe from the video, but also a chart that gave me options to use different fruits and nuts in the recipe. You will also find all the hows and whys for soaking nuts and seeds along with some great worksheets for you to write up your own thoughts and recipes using her formula.

I love that my enrollment includes lifetime access to the materials so I can go back and refresh and not be pressured to get through it all by a certain time. Life is crazy and things come up, especially in the summertime. I am excited to start browsing this Tuesday and being inspired to do new things, or old things in a new way.

Take a look at the bonus lesson and see if it is something that might be for you too. If you enroll through any link on my site I will get credit for the sale, but I am only promoting the e-course because I truly feel it is valuable information that will help you navigate traditional cooking with real food in this fast food world.

Thursday, May 27, 2010

Food Journal

Seeing your daily food choices in black and white can change the way you eat. When you change the way you eat, you change the way you feel. This change leads to more good food choices. It is a day by day progress.

Check out my two day food journal at Nourishing Days. Then start one of your own. It is a great exercise to practice thoughtful eating and see the big picture of what is going into your mouth.

Wednesday, May 26, 2010

Baked Zucchini

One of the most prolific plants in the garden and hardy as all get out, summer squash is worth every inch it takes over. During peak season there is always excess, so if you don’t grow it, find someone who does and they would be happy to unload some. I have grey, yellow straight and black beauty going and I use them all the same. It is fun to mix them all together and get different shades of color.

What do you do with all these mild vegetables to keep things mixed up? There is the obvious zucchini bread that more often than not is not as healthy as it sounds. You can certainly make it better by making some simple substitutions. Another great option is to grate it up and add it to stir fries and casseroles. I love it in my taco meat, enchiladas and sloppy joes this way. Grate it up and freeze in recipe sized bags to use it year round. If you have squash that are over grown, just scoop out the seeds and fill the cavity with pasta sauce, cheese and bread crumbs, then bake for a great side dish.

This recipe makes a fun side dish that has wide appeal. I avoid using the store bought cooking sprays in the cans as they use cheap oils and added junk that I don’t want. Nor Pro makes a “Mr. Mister” that I use for my oil spraying needs. The oil aids in browning in this recipe which give a better appearance, texture and flavor. I make my own bread crumbs from bread failures (bricks) and keep them in the freezer so they are ready to use.

2 med. summer squash, thickly sliced (7mm on mandolin)
1 egg beaten until frothy
1/3 cup sprouted flour
1/3 cup finely grated piave or parmesan
1/3 cup whole wheat bread crumbs
2 teaspoon Italian seasoning
½ teaspoon garlic salt
1/8 teaspoon pepper

Combine flour, cheese, bread crumbs and seasonings. Coat each zucchini round in beaten egg, then in flour mixture, place on a baking sheet lined with parchment paper and sprayed with oil. Once laid out, spray the tops of each round with oil and bake for 18 minutes at 375 degrees. Serve with marinara or ranch dressing.

Wednesday, May 19, 2010

Garden Update


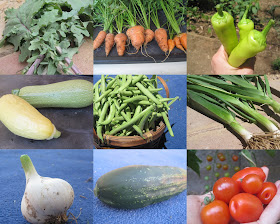
I have been having a blast eating from my garden this month. Last night I was giddy as I was preparing dinner and made a few trips outside for ingredients; tomatoes, green onion, peppers and cilantro. The tomatoes are just getting started as I did all my plants from seed this year. Layne loves tomatoes and picks them and eats them when they are still orange, so I have not had too many. Soon, there will be too many for his little belly and I will be in tomato heaven.

Summer squash is in full production right now. I have only 2 plants and get at least 1 a day. I have 4 more plants that are coming into maturity in the next couple weeks. I have been doing a lot of this and that to keep up with what I have.

My cucumbers were producing like crazy a couple weeks ago, then a hiccup caused production to halt. It happens every year a number of times, usually ends up killing everything...watering problems. I have it on a automatic timer, which appears to be to be the best way to water consistently. That is unless you have busy-fingered kids, a forgetful husband or construction workers that haven't a clue. Last week, some mysterious person messed with the watering system and the garden went through an approximate 2 day drought :( I lost some tomatoes and peppers that were setting, melon and squash that shriveled and overall made for weaker plants.

Most of my plants were affected by the aphids; crispy, spotted leaves. I think the green beans were hit the hardest, though they seem to be growing new green leaves as I pick off the crunchy brown ones. I took out all my carrots so that I could plant a new crop of beans.  They are about to blossom, so if the old ones don't start making more beans soon, they will be taken out to make room for some new lettuce. All my pathetic-half eaten lettuce has now bolted, which makes it bitter.

There is so much more to share, but we are nearing the end of nap time, so I must be mom at the moment.  Happy gardening to all.

This post is part of Real Food Wednesday's

Monday, May 17, 2010

Know-How?

Had a blast this year holding cooking classes in my home. All it takes is a little motivation and vision to be able to carry out new healthful techniques in your own kitchen. There is an ECourse coming out soon through Nourished Kitchen that I trust will be phenomenal. Check out the video and sign up HERE.

Thursday, May 13, 2010

Coconut Cream Concentrate

I found this delicious and nutritious product that I can’t help but tell you about. I just got it a few weeks ago from Tropical Traditions. I have been having so much fun experimenting with it in hot breakfast cereal, smoothies, cake and frosting…next is ice cream :)

Coconut Cream Concentrate is purely ground up high quality coconut meat with BIG coconut flavor. It comes in glass jars (no BPA!) no additives, fillers or water. This concentrate resembles natural peanut butter in texture. The oil rises to the top and you stir it in to make a nice smooth spread. Mm, mm, mmm!

The best sale I have seen is going on right now. You end up with 4 jars, but they make great gifts!

Make sure you get signed up for my last class of the season this Saturday. We will be making and taking yummy tortillas made with spelt. And a special bonus surprise!

Tuesday, May 11, 2010

Creamed Leeks

I have been pulling some cute leeks out of my garden, anything smaller that regular grocery store size are labeled “cute.” I think their growth was stunted from the first two months they grew without any fertilizer in beautiful black soil with a high pH and that was major lacking in nutrients, particularly nitrogen. They taste as good as ever and having used up all my potatoes (lest you think I am lying, those are turnips in the background) and not really being soup season anymore, I have created a new way to use this cute winter crop.

As pictured here, I served it on top of salmon (Costco’s Wild Atlantic). This adds great flavor to a simply prepared piece of fish or chicken. As a stand alone side dish, I spooned the creamed leeks into small crème brulee dishes. Any little ramekin would do, or a pie dish to serve the whole family. I sprinkled each one with swiss cheese and bread crumbs and broiled for 2 minutes. We have a little toaster oven that works great for this. It is really yummy! We have a rule that anything you pick from the garden, you have to eat. Layne has been busy pulling up leeks.

3 regular or 8 “cute” leeks
1 tablespoon butter
½ teaspoon salt
1/8 teaspoon pepper
½ cup cream

Cut off leek roots and spilt in half lengthwise. Swish around in a bowl of water to get all the dirt out. Chop into small pieces, discarding the dark green parts that are tough. Melt butter in pan over medium high heat. Add leeks and cook for 2 minutes stirring frequently. Turn heat down to medium low and cook for 10 minutes, stirring every three minutes or so. Add salt, pepper and cream. Stir and continue to cook until the dish is thick and all water has evaporated. Serve over a simply prepared fillet of fish or chicken.

Tuesday, May 4, 2010

Side By Side Comparison

Sometimes new recipes come together in a snap, like soups, they hardly ever give me trouble. Other recipes take a couple times to get them just right, like cookies, next time I will add less flour and they will be perfect. Then there are the recipes that just bomb over and over again, I am talking about bread here. Anyone else have a bread making handicap?

Of coarse there was the expected learning curve of a rookie bread maker, I can accept that. I then received bread baking training from Chef Brad and became a master…of one whole wheat recipe. Those were the “golden years”, my bread consistently turned out beautiful and delicious. It became therapeutic in nature and I taught many others Chef Brad’s method and recipe through “Chef Brad Events.” I stocked up on hard white wheat because I was going through it rather quickly. I bought from where ever I found a good sale.

All at once, my dreams shattered as my bread turned into a dense, crumbly failure over and over again. I was baffled, no clue. I tweaked the water, the oil, the sweetener, the yeast, the rise time, the oven heat, the kneading speed, I added gluten, to no avail!

Our bread consumption slowed and nearly halted before one day when it came out as tender and light as ever. Two buckets of wheat, that were ruining my life and I had no idea. One night I did a side by side bake off with three of my remaining buckets, using all the same ingredients and methods. One failed miserably and got the axe. You can get rid of anything on craigslist, even if you list it as “bad wheat.”


The euphoria began to diminish again when I learned about soaking. I love bread and always admiringly watched my husband eat a whole loaf while I nibbled my max of 2 slices. During the “golden years” it didn’t take long before I recognized the tummy aching effects of too much bread. Neutralizing phytic acid and pre-digesting struck a cord with me. Now I am on a new quest for finding a good recipe that will yield light, delicious results and a highly digestible product.

It has been about a year and I think I am making some headway. It has to be completely up to my “What good is a healthy dish if nobody eats it” standards before I will post it. Because let’s face it, who needs another sour, heavy, crumbly sour dough bread recipe out there?

This post is part of GNOWFGLINS Tuesday Twister.